 |
|
 |
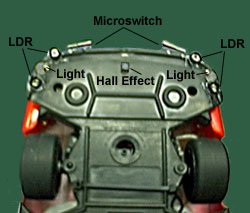 |
Decide on the type of sensors you require and go shopping. We initially dabbled with infra-red (IR) emitters and sensors (They cost about $1.25 for the receiver and $1.95 for the emitter). I decided to instead use simple light dependent resistors (LDRs). These were simpler to use and gave a better reading. We then had to purchase mini light bulbs to complete this set up. We also had to purchase a Hall Effect sensor to detect the magnetic strip signaling corner entries and exits on the track (Tip: Make sure you know the Hall Effect switch's pinout). [ Editor's note: Paul sported a chip-shaped burn for a few days :-) ] We also needed some bump sensors, so I purchased some micro switches. Below is a list of the equipment and components used and their cost where known.
| Quantity | Component | Total Cost |
|---|---|---|
| 1 | Model Car | $40.00 |
| 6 | LDR | $15 |
| 4 | mini-light bulb | $10 |
| 4 | micro switch | $7.80 |
| 1 | Hall Effect Sensor | $3.50 |
Other miscellaneous items included in our project.
| Quantity | Component | Total Cost |
|---|---|---|
| 8 | Rechargeable Batteries AA 1000 mA | $40 |
| 6 | Rechargeable Batteries AA 600 mA | $15 |
| 15 metres | Insulated Wire | $4.50 |
| 6 | HeatShrink Tubing 2.5mm/1.5mm x 1.2m | $7.20 |
| 2 | 28Way Launcher Vertical | $3.00 |
| 1 | Pkt Self Tapper Screws | $2.20 |
| 1 | Battery Holder 6AA | $1.50 |
| 1 | Quality 9v battery snap | $0.55 |
| 1 | pkt insulok plastic ties | $6.00 |
| Electrical Solder |
Tools we used on this project
| Wire Stripper double action | $7.47 | |
| Soldering Iron | ||
| Heat Glue Gun | ||
| Battery Charger | ||
| Arlec Handy Drill Kit | $50 | |
| Long Nose Pliers | ||
| Stub Nose Pliers | ||
| Side Cutters | ||
| Screw Driver Set | ||
| Drill Set | ||
| Multimeter | ||
| Male/Female Parallel Computer Cable | ||
| Other | Kneed It Epoxy Putty | $12 |
The construction process was simply a matter of stripping the car of its radio control gear, replacing the steering motor with the servo, drilling holes ... soldering and wiring in all the sensors. Nothing was too difficult, although a reasonable amount of time was required. We used hot glue and screws to mount the sensors. The wiring of the sensors and motors to the handy board is pretty well 'plug and play'. We simply followed instructions in the Handy Board manual which is actually relatively easy to understand. We did do it hard with the Handy Board in that we had to solder this together - we paid less ($200) for the unsoldered version. I recommend getting the finished product simply to save time and trouble. Hence I have based our costs on the $250 assembled version.
We have now completed the construction of the car and are busily programming it to win the race - we hope. What's the cost? Well it's hard to say in total because we in a team of 5 had a number of resources on hand i.e. all the non priced items. However to save you the trouble of adding up the figures, so far we have spent
The Total Cost To Date is: $418.25
I didn't include the battery charger or wire strippers as these are non car specific. Note too the battery price is not exact as I actually paid more by not shopping around. I actually paid $6.89 for each 800mA battery. These were quality batteries, but I found the prices at Jaycar for the nameless ones much more reasonable. We used 2 sets of batteries. The 8 x 800mA batteries we placed in the cars existing battery holder. These batteries drive the cars main motor a 5volt tap drives the cars servo motor. The other 6 batteries were standard arlec I had around the house purchased at Kmart. These we used to drive the computer and lights for the LDR sensors.
If one takes out the computer and the batteries, the cost is a reasonable $113.25 for our little car. That's a $73.25 adaptation to our $40 radio controlled car.
I hope this is useful and inspires lots of people to have a go in this interesting competition.
 |